Hi folks. Because enabling an SSL certificate on a SQL Server Failover Cluster, thus enabling encryption for your data in-motion, is a little bit tricky, I decided to write this article in order to help you out a bit, since in the past, I encountered the same difficulties.
So, please read on to learn more about how you can enable an SSL Certificate-Based encryption on a SQL Server Failover Cluster.
Step 0 – Preparation: Create a Proper SSL Certificate
The first step prior to start doing anything on your database servers, is to make sure that your CA has generated a proper SSL certificate for your SQL Server Failover Cluster. To this end, must ensure that the CN (common name) and SAN (subject alternative names) are correct.
To better undestand this whole situtation, we need an example.
So, consider that we have a Windows SQL Server Failover Cluster that consists of 2 nodes, and has the below details:
- Cluster management name: cl-sql.example.com
- Node 1 name: sql-node1.example.com
- Node 2 name: sql-node2.example.com
- SQL Server Instance virtual name: sqlinstance.example.com
A proper SSL certificate would have the below characteristics:
- CN: cl-sql.example.com
- SAN:
- sql-node1
- sql-node1.example.com
- sql-node2
- sql-node2.example.com
- sqlinstance
- sqlinstance.example.com
So, you generate a single SSL certificate that will be used on all nodes that participate in the Failover Cluster.
Step 1: Import the certificate in Windows for Local Computer (not user)
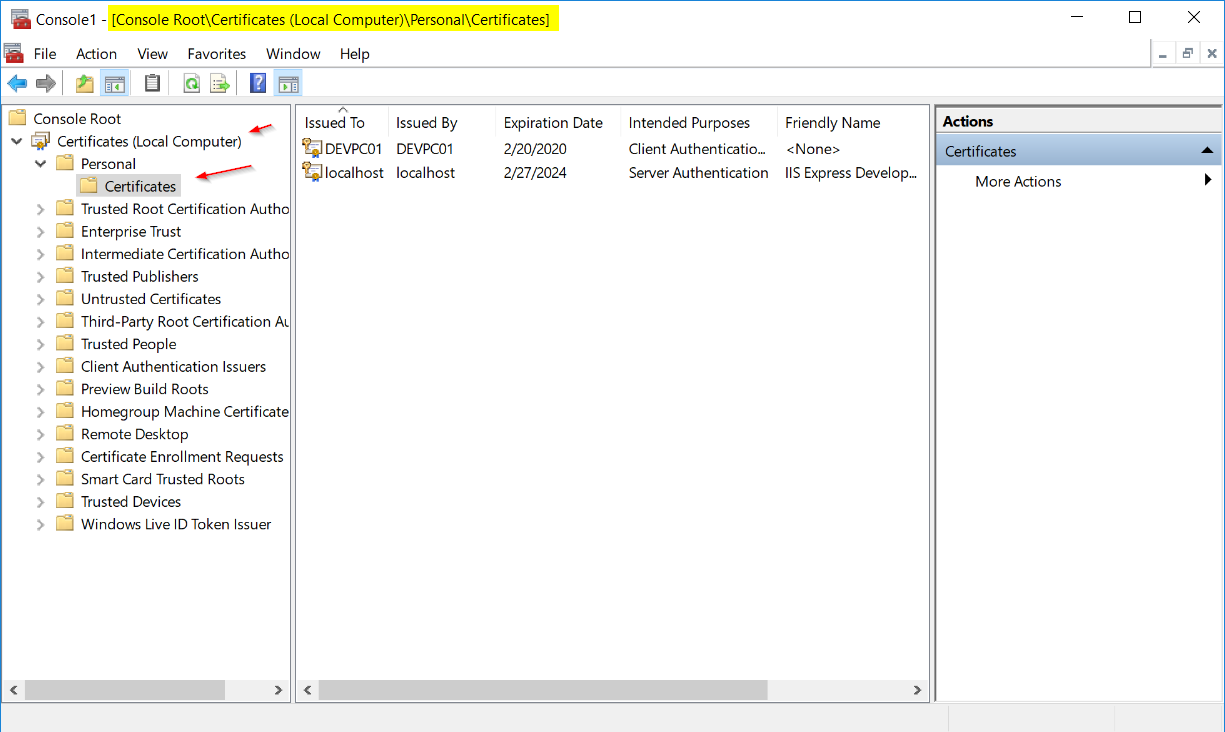
You can do this via Microsoft Management Console (mmc). The correct path to import the certificate is:
Console Root\Certificates (Local Computer)\Personal\Certificates
Step 2: Set Full-Control Permissions on the Certificate for the Right User
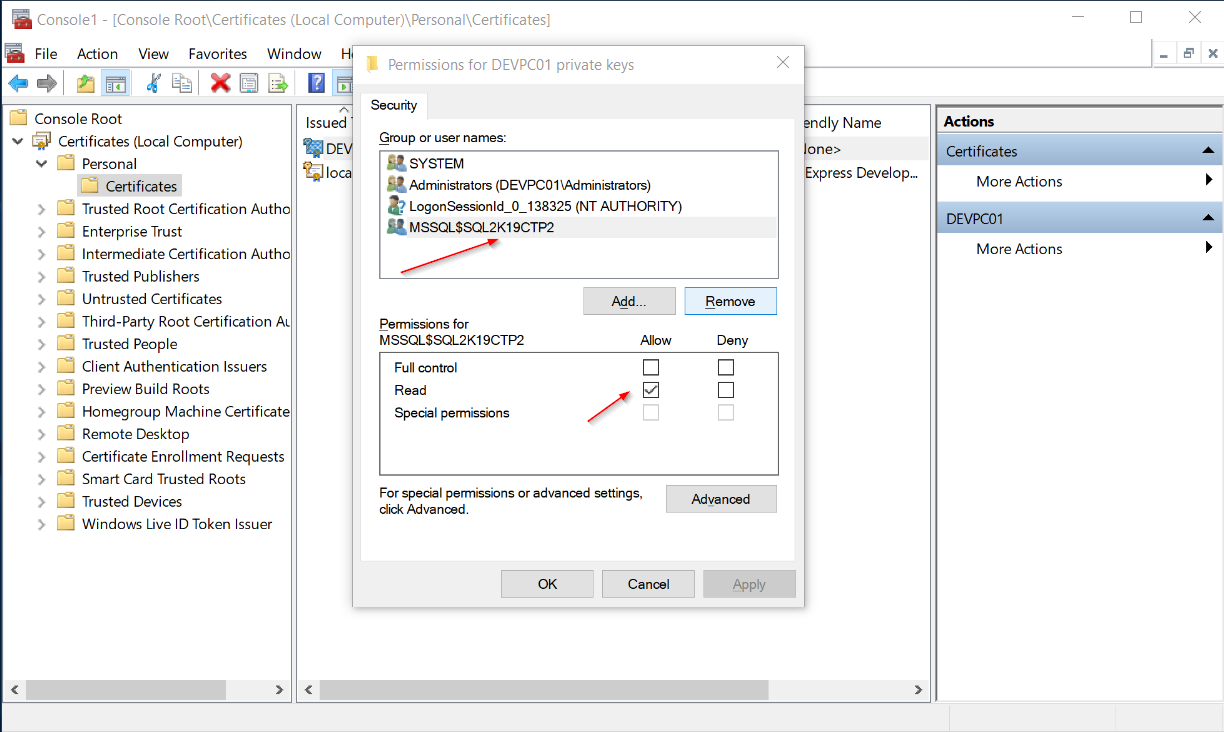
The next step is to give full control to your SQL Server instance’s service account on the certificate.
To do this, you right-click on the certificate, go to “All Tasks”, “Manage Private Keys…”, and then you add the SQL Server service account and give it Read Access.
Note: In this case, since I work on a VM, I’m not using a domain user as the service account for SQL Server which by the way, using a domain user with least privilege is the recommended security best practice.
Strengthen your SQL Server Administration Skills – Enroll to our Online Course!
Check our online course on Udemy titled “Essential SQL Server Administration Tips”
(special limited-time discount included in link).
Via the course, you will learn essential hands-on SQL Server Administration tips on SQL Server maintenance, security, performance, integration, error handling and more. Many live demonstrations and downloadable resources included!

Step 3: Get the Certificate’s Thumbprint
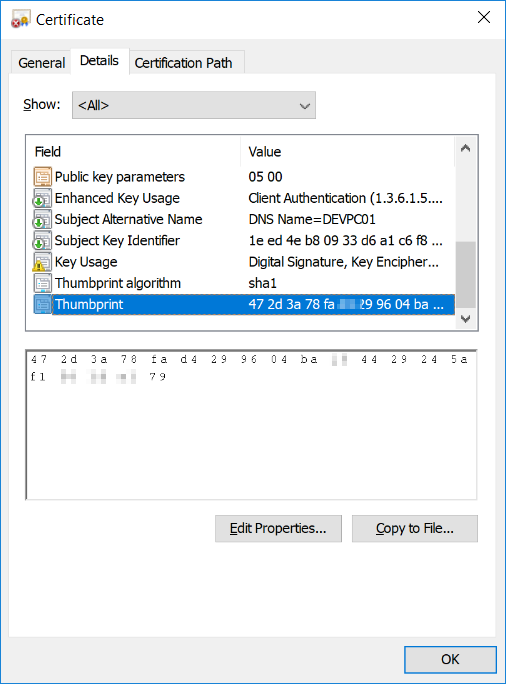
Double-click on the certificate, go to the “Details” tab, and click on the “Thumbprint” field on the certificate’s list of fields. Then, copy the value for that field displayed below.
Paste the value in a new text file, save the file and exit.
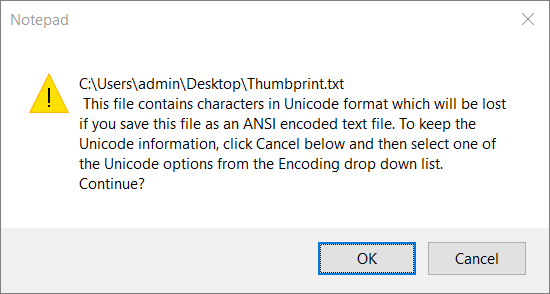
At some point you will get a warning and will be told that the file contains characters in Unicode format…
What you do: You ignore the warning, you click OK and the text file is created.
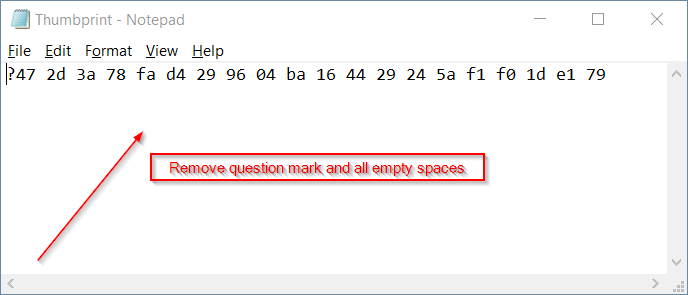
Step 4: Get the Certificate’s “Clean” Thumbprint
You re-open the text file you created in step 3, you remove the first character in case it is a question mark (?) and also remove all empty spaces.
You then save the file for future reference and also copy the “clean” thumbprint value from the text file to the clipboard.
Step 5: Edit Windows Registry
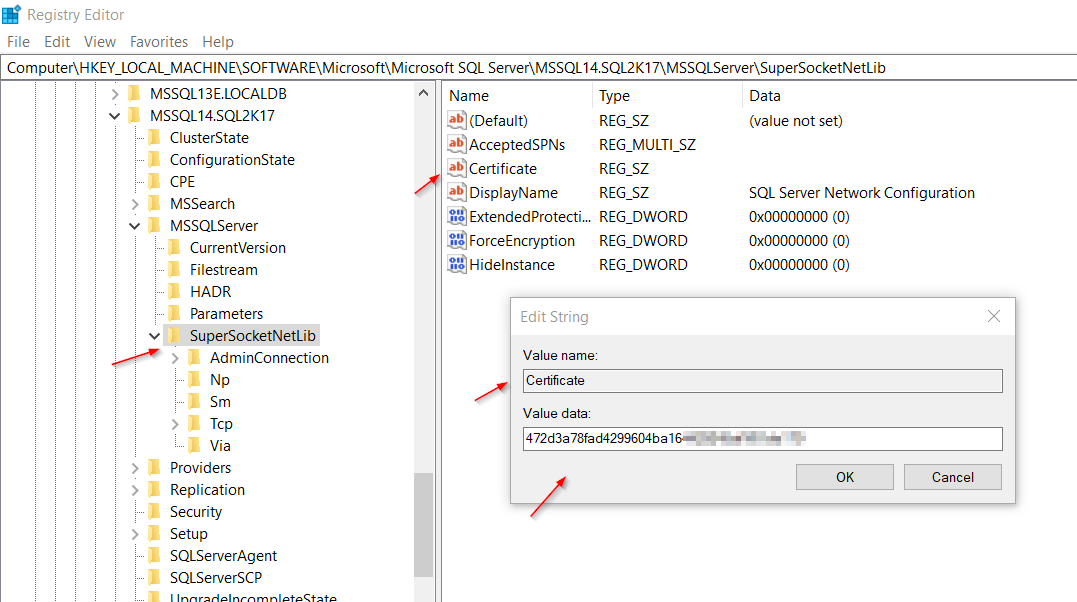
You open Windows Registry (start – run: “regedit”) and navigate to:
HKEY_LOCAL_MACHINE\SOFTWARE\Microsoft\Microsoft SQL Server\[*Instance ID]\MSQLServer\SuperSocketNetLib,
Then, there you will find a key named “Certificate“. You double-click on it and paste in the “Value data” text field the certificate’s processed “thumbprint” value you copied earlier from the text file, after you removed the question mark and all empty spaces.
Note: [*Instance ID] consists of the SQL Server product build (i.e. MSSQL14 is for SQL Server 2017, MSSQL15 for 2019, etc.) and the SQL Server instance name. In my case, my instance ID is “MSSQL14.SQL2K17“.
That’s it! You now need to perform the exact same procedure to all nodes participating to the Failover Cluster, and in order for changes to take effect, you need to restart SQL Server by performing failovers between all participating nodes.
Step 6: SQL Server Configuration Manager
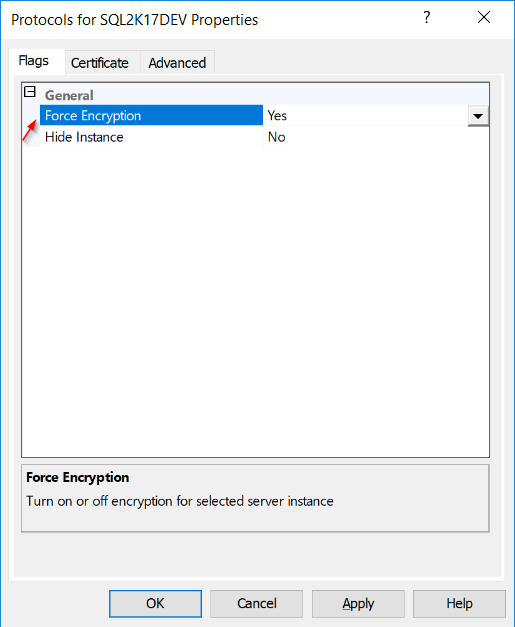
In SQL Server Configuration Manager, you navigate to “SQL Server Network Configuration”, and then, for the SQL Server instance you want to enable SSL encryption, you right click on “Protocols for [instance name]” and enter its Properties.
If you go to the “Certificate” tab, even though the certificate is loaded for encryption, you won’t see the certificate there due to the fact that this is a failover cluster. So, the only thing you can control from there, is in the “Flags” dialog, where you need to set the “Force Encryption” flag.
So this is the point, where you decide whether you set this flag to “Yes” which means that all connections will be forced to go through the encrypted channel with the SQL Server instance, or if you set the flag to “No”, it means that you will both allowing encrypted and unencrypted connections.
By the time you decided to use an SSL certificate, it is recommended to set this flag to “Yes” and tackle any issues with any applications. Of course, just with any changes, you will need to test the entire process on a Test Environment.
Step 7: The Verification
The last step, is to verify that the SSL certificate is successfully loaded for encryption, each time your SQL Server instance starts. You will need to test this on all Failover Cluster nodes. Therefore, you will need to failover the SQL Server instance one-by-one, on all cluster nodes and check the SQL Server log.
Right after you start the SSL-enabled SQL Server instance, if the SSL certificate is successfully loaded, you will see somewhere in the log, a message saying the below:
“The certificate [Cert Hash(… ‘[certificate thumbprint value]’ was successfully loaded for encryption”
![]()
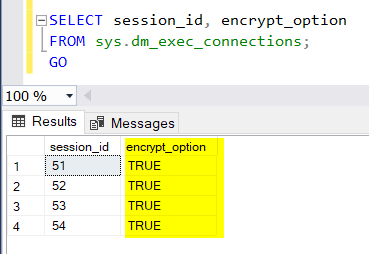
Alternatively, you can check the encryption option for all current connections on your SQL Server instance, using the below T-SQL script:
SELECT session_id, encrypt_option
FROM sys.dm_exec_connections;
GO
Here’s the outcome of the above T-SQL script’s execution on my VM:
Cool! As you can see, all connections (sessions) on my SQL Server instance, are encrypted!
What about SQL Server 2019?
I have good news about SQL Server 2019 and SSL certificate-based encryption. SQL Server 2019 has its own Certificate Manager built-in SQL Server Configuration Manager 2019. Therefore, from SQL Server onward, you do not need to go through this whole process to enabled SSL certificate-based encryption for SQL Server failover clusters. You just import the SSL certificate on each node using SQL Server’s Certificate Manager!
If you want to learn more about all the cool new features in SQL Server 2019, then you should definitely check my course at Udemy titled “SQL Server 2019: What’s New – New and Enhanced Features“.

Via this course, you will learn about all the major new features and enhancements in SQL Server 2019. Via a 3-hour journey with a combination of lectures, live demonstrations, quizzes and a practice test, you will get up to date with SQL server 2019 in no time!
Learn More
Featured Online Courses:
- SQL Server Security Best Practices
- AI Demystified: A 1-Hour Beginner’s Guide (Suitable for Non-Technical People)
- AI Essentials: A Beginner’s Guide to Artificial Intelligence
- Human-AI Synergy: Teams and Collaborative Intelligence
- Data Management for Beginners – Main Principles
- SQL Server 2022: What’s New – New and Enhanced Features
- Working with Python on Windows and SQL Server Databases
- Introduction to Azure Database for MySQL
- Boost SQL Server Database Performance with In-Memory OLTP
- Introduction to Azure SQL Database for Beginners
- Essential SQL Server Administration Tips
- SQL Server Fundamentals – SQL Database for Beginners
- Essential SQL Server Development Tips for SQL Developers
- Introduction to Computer Programming for Beginners
- .NET Programming for Beginners – Windows Forms with C#
- SQL Server 2019: What’s New – New and Enhanced Features
- Entity Framework: Getting Started – Complete Beginners Guide
- A Guide on How to Start and Monetize a Successful Blog
Other SQL Server Security-Related Articles:
- DBA Security Advisor v2.3 is Now Out!
- Why You Need to Secure Your SQL Server Instances
- [DBNETLIB] [ConnectionOpen (SECDoClientHandshake()).] SSL Security Error – How to Resolve
- Should Windows “Built-In\Administrators” Group be SQL Server SysAdmins?
- SQL Server Row Level Security by Example
- Frequent Password Expiration: Time to Revise it?
- Policy-Based Management in SQL Server
- The “Public” Database Role in SQL Server
- Encrypting SQL Server Databases
- Transparent Data Encryption (TDE) in SQL Server
- Encrypting a SQL Server Database Backup
- What is Data Security and which are its Main Characteristics?
- SQL Server Always Encrypted with Top 5 Q&A
- …check all
Check Also:
Subscribe to the GnoelixiAI Hub newsletter on LinkedIn and stay up to date with the latest AI news and trends.
Subscribe to the SQLNetHub YouTube channel (SQLNetHub TV).
Subscribe to my personal YouTube channel.
Rate this article:
Reference: SQLNetHub.com (https://www.sqlnethub.com)
© SQLNetHub
Artemakis Artemiou is a seasoned Senior Database and AI/Automation Architect with over 20 years of expertise in the IT industry. As a Certified Database, Cloud, and AI professional, he has been recognized as a thought leader, earning the prestigious Microsoft Data Platform MVP title for nine consecutive years (2009-2018). Driven by a passion for simplifying complex topics, Artemakis shares his expertise through articles, online courses, and speaking engagements. He empowers professionals around the globe to excel in Databases, Cloud, AI, Automation, and Software Development. Committed to innovation and education, Artemakis strives to make technology accessible and impactful for everyone.


 (9 votes, average: 4.89 out of 5)