In Microsoft Azure, there are two main options for SQL Server services. The first option is Azure SQL Database (PaaS). The second option in SQL Server on Azure (laaS). In a previous article, I explained how you can create a SQL Server instance and database on Azure SQL Database. In this article, we are going to see step-by-step, how to create an Azure SQL Server Virtual Machine.
More specifically, for this article, we are going to create a simple VM with SQL Server 2019 CTP2.0 (learn what’s new).
Note: Since this is a demo, I will be following a simplified process, thus not taking into consideration all best practices.
Alright, let’s start!
Step 1: Create a new resource in Azure (SQL Server Virtual Machine)
Click the “Create a resource” link and search for “SQL Server 2019 on windows“.
Then, select the template “Free SQL Server License (CTP2.0)SQL 2019 Developer on Windows Server 2016″ and click on the “Create” bvtton.
Important note: Since this is a demo, I’m using the developer edition of SQL Server which can be used for testing/demo purposes. In case you want to create an Azure SQL Server Virtual Machine for Production purposes, please read here for pricing.
Step 1a: Choose a VM template
Learn more about Azure SQL Database: Enroll to our Online Course!
After clicking the “Create” button, you will need to configure the SQL Server VM.
In the below screen, I’m configuring some basic settings.
Step 1c: Set the Size of the VM
On the next screen, I choose the size of the VM:
Step 1d: Settings
On the next screen, I can set optional features but since this is a demo, I won’t set anything special such as high availability etc. The one thing I would like you to note at this step, is the “Select public inbound ports” option. For this option, for the time being, I selected “No public inbound ports” as I will set it up later, in a more controlled manner.
Security note: You need to carefully control which IPs can access your online resources on Azure. Therefore, you don’t just “enable” something. You need to have full control and always go through the advanced settings.
OK, cool. Let’s click on “OK” and proceed to the next screen of the basic configuration of our SQL Server VM.
Step 1e: SQL Server Settings
The next screen, is where you set SQL Server setting such as: SQL connectivity, port (always change the default port), SQL Authentication, sysadmin login, etc. A cool thing is that you can set SQL Automated Patching – no more headaches for DBAs! 🙂
Security Note: If you choose “Public” for the “SQL connectivity” option, you need to carefully set security in order to protect your SQL Server instance within the VM from potential unauthorized access from the Internet.
Step 1f: Summary
After you finish with SQL Server settings and click “OK”, you reach the last screen, where your options are being validated. If everything OK, you will get the below screen, which among other, displays a summary of all your options:
That’s it! After you click on the “Create” button, your Azure SQL Server VM will be created, based on the settings you’ve set.
Step 2: Access the Azure SQL Server Virtual Machine via RDP
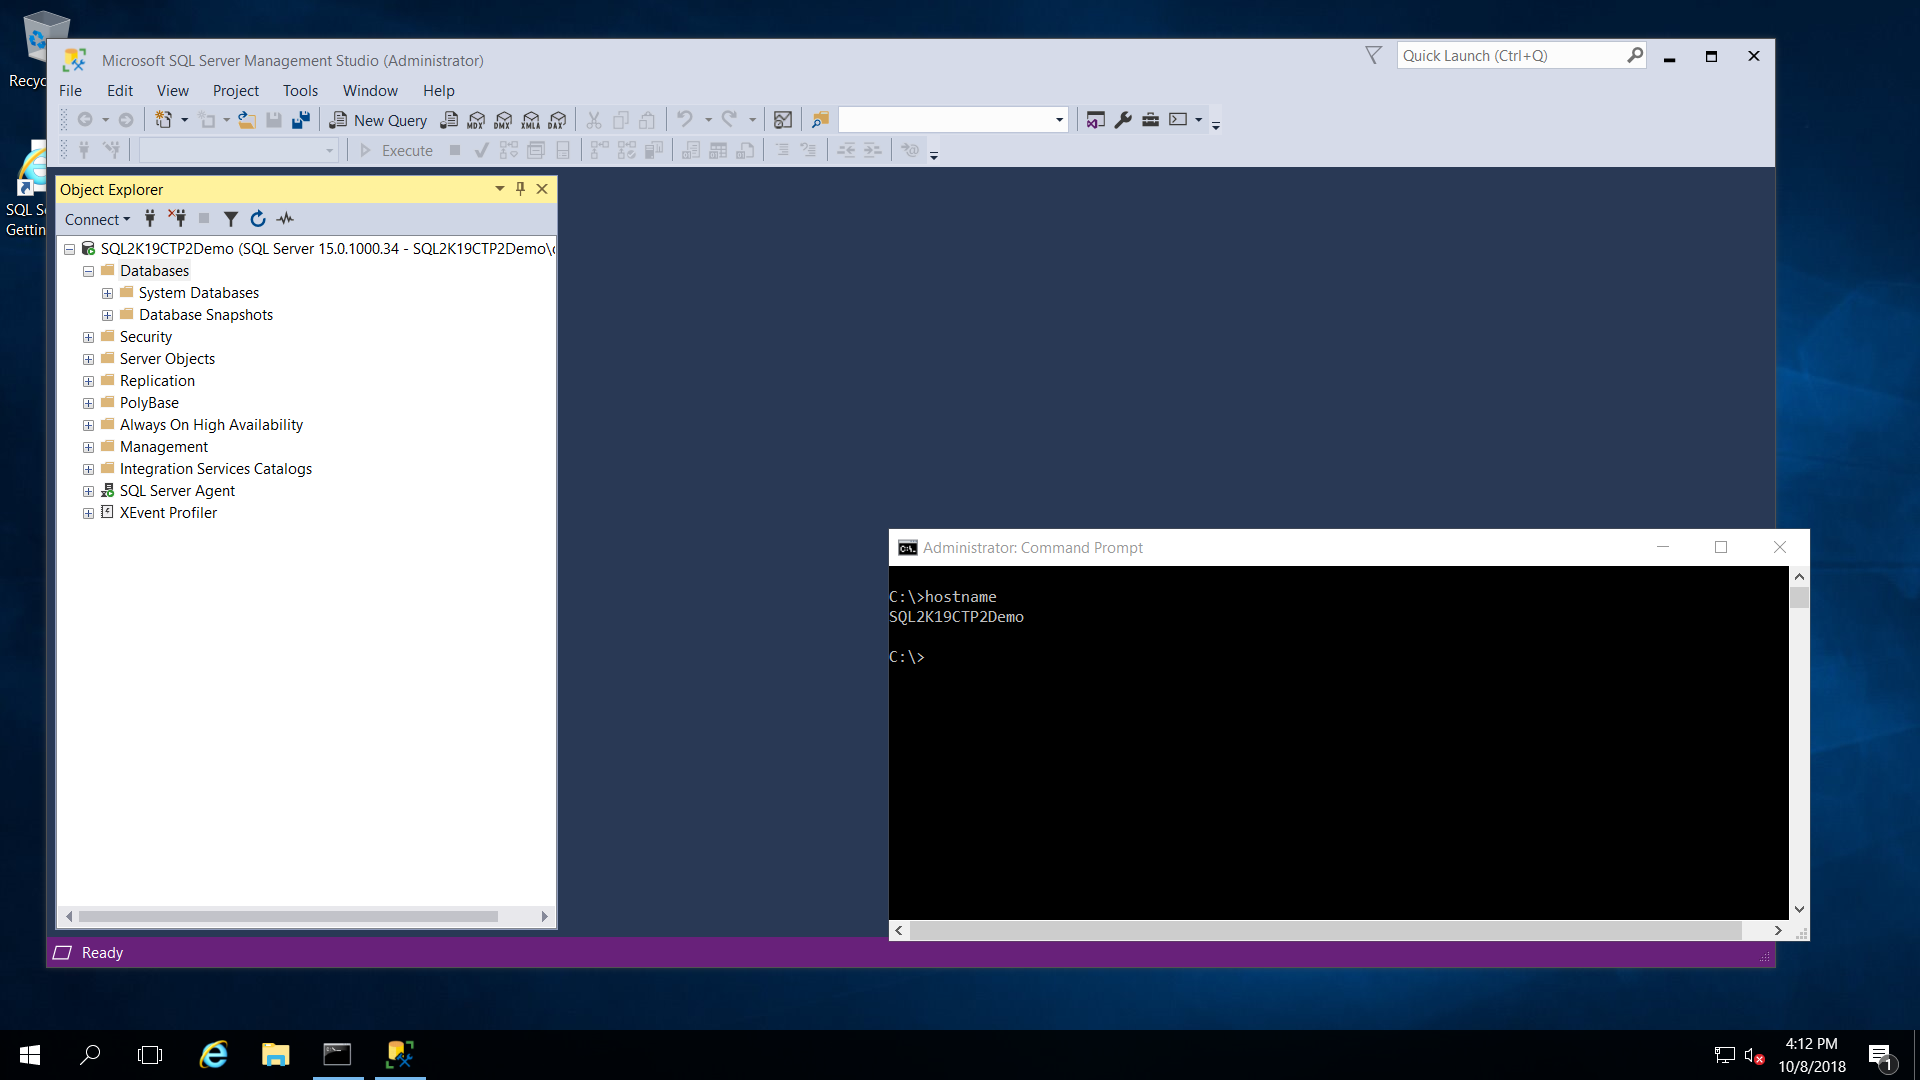
Now that my VM with name “SQL2K19ST2Demo” has been deployed, I need to access it.
Let’s say I need to remotely access my VM. In order to do this, I need to add an inbound firewall rule as below:
Security Note: It is critical to be very careful when adding or modifying firewall rules for your Virtual Machines. Always work with specific IPs and Ports, especially in cases where you expose any resources to the Internet. Also, consider using VPN for site-to-site connections.
Now, as you can see in the below screenshot, I have managed to successfully connect.
Step 3: Access the SQL Server Instance on Azure VM via SSMS
In order to connect to SQL Server on the Azure VM using SSMS, again, like in the case of the RDP connection, you need to manage your firewall rules.
If you haven’t added a firewall rule during the VM creation, if you want, you need to add an inbound firewall rule in order to allow SQL access.
Take for example the below screenshot, where I have added an additional inbound firewall rule for my VM.
In this rule, I have set the below:
Source IP
Source port range
Destination IP addresses
Destination port ranges
Priority
Security Note: It is critical to be very careful when adding or modifying firewall rules for your Virtual Machines. Always work with specific IPs and Ports, especially in cases where you expose any resources to the Internet. Also, consider using VPN for site-to-site connections.
As you can see, I’m only allowing inbound traffic for my IP (source IP) to one specific port (SQL) on my VM.
Now, I will try to connect to my Azure VM’s SQL Server instance using SSMS.
In the “Server name” field I entered the public IP of my VM, as well as entered my credentials.
If you try to connect like the above, there is a chance that you get an error similar to the below:
.TITLE: Connect to Server ——————————
Cannot connect to ……..
—————————— ADDITIONAL INFORMATION:
A connection was successfully established with the server, but then an error occurred during the login process. (provider: SSL Provider, error: 0 – The certificate chain was issued by an authority that is not trusted.) (Microsoft SQL Server, Error: -2146893019)
Therefore, before clicking on the “Connect” button, in the “Connection Properties” tab, you need to check the “Trust server certificate” option.
OK, now after I click on the “Connect” button, you can see that I have managed to connect to the SQL Server instance on my Azure VM:
Conclusion
Azure Virtual Machines is a very fast and handy way to create, among other, SQL Server machines. Microsoft Azure provides a large set of virtual machine templates, which make the whole process easier and faster. Moreover, you can fully customize the VM during its creation, and later.
In this article and demo, we created an Azure SQL Server Virtual Machine with SQL Server 2019 CTP2.0, and we managed to connect using RDP and SQL access via SSMS.
As with creating any resource on Azure, when creating Azure Virtual Machines, you need to be very careful with the network/firewall permissions you set, especially in the case where the VM is exposed to the Internet. Moreover, consider using VPN for site-to-site connections.
See More! Enroll to the Online Course!
Learn more about Azure SQL Database and get started fast and easy! Through our online course “Introduction to Azure SQL Database for Beginners“, you will get lifetime access to a comprehensive set of lectures and live demonstrations that will get you started with Azure SQL Database in no time! The course is regularly updated with additional educational material!
(Lifetime Access, Certificate of Completion and more!)
Artemakis Artemiou is a seasoned Senior Database and AI/Automation Architect with over 20 years of expertise in the IT industry. As a Certified Database, Cloud, and AI professional, he has been recognized as a thought leader, earning the prestigious Microsoft Data Platform MVP title for nine consecutive years (2009-2018). Driven by a passion for simplifying complex topics, Artemakis shares his expertise through articles, online courses, and speaking engagements. He empowers professionals around the globe to excel in Databases, Cloud, AI, Automation, and Software Development. Committed to innovation and education, Artemakis strives to make technology accessible and impactful for everyone.
Views:6,994
We use cookies on our website to give you the most relevant experience by remembering your preferences and repeat visits. By clicking “Accept All”, you consent to the use of ALL the cookies. However, you may visit "Cookie Settings" to provide a controlled consent. Read More
This website uses cookies to improve your experience while you navigate through the website. Out of these, the cookies that are categorized as necessary are stored on your browser as they are essential for the working of basic functionalities of the website. We also use third-party cookies that help us analyze and understand how you use this website. These cookies will be stored in your browser only with your consent. You also have the option to opt-out of these cookies. But opting out of some of these cookies may affect your browsing experience.
Necessary cookies are absolutely essential for the website to function properly. These cookies ensure basic functionalities and security features of the website, anonymously.
Cookie
Duration
Description
cookielawinfo-checkbox-analytics
11 months
This cookie is set by GDPR Cookie Consent plugin. The cookie is used to store the user consent for the cookies in the category "Analytics".
cookielawinfo-checkbox-functional
11 months
The cookie is set by GDPR cookie consent to record the user consent for the cookies in the category "Functional".
cookielawinfo-checkbox-necessary
11 months
This cookie is set by GDPR Cookie Consent plugin. The cookies is used to store the user consent for the cookies in the category "Necessary".
cookielawinfo-checkbox-others
11 months
This cookie is set by GDPR Cookie Consent plugin. The cookie is used to store the user consent for the cookies in the category "Other.
cookielawinfo-checkbox-performance
11 months
This cookie is set by GDPR Cookie Consent plugin. The cookie is used to store the user consent for the cookies in the category "Performance".
viewed_cookie_policy
11 months
The cookie is set by the GDPR Cookie Consent plugin and is used to store whether or not user has consented to the use of cookies. It does not store any personal data.
Functional cookies help to perform certain functionalities like sharing the content of the website on social media platforms, collect feedbacks, and other third-party features.
Performance cookies are used to understand and analyze the key performance indexes of the website which helps in delivering a better user experience for the visitors.
Analytical cookies are used to understand how visitors interact with the website. These cookies help provide information on metrics the number of visitors, bounce rate, traffic source, etc.
Advertisement cookies are used to provide visitors with relevant ads and marketing campaigns. These cookies track visitors across websites and collect information to provide customized ads.


 - Article on SQLNetHub")


")
