This is the first of a series of posts dedicated to the ADO .NET Entity Framework. The purpose of these posts is to try to provide the necessary knowledge on what exactly is the Entity Framework, how can be used and how can help for an easier, faster and more efficient Data Access experience with using SQL Server 2008 and Visual Studio 2008 when building a data application.
A relevant post which provided an overview of the ADO .NET Entity Framework can be found here.
Well, let’s start!
Our Test Environment
All the examples, screenshots, demos, etc., will be based on the following:
Learn all about Entity Framework, what it is, how it works, how to use it for data access when developing .NET apps, what are its available workflows and their pros and cons. Also, via comprehensive live demonstrations, we will build many apps using Visual Studio with C# and Entity Framework.
(Lifetime Access, Downloadable Resources and more!)
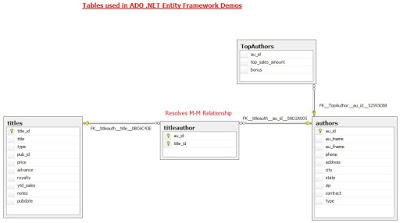
On the following screenshot, you can see the Database Diagram representing the database objects (just tables) of the Pubs sample database that are used for the demos in this series of posts. Note that the TopAuthors table was added manually by me as I needed a new table for supporting my demo for Entity Splitting
Before describing the above diagram, a few words about the Pubs database. This sample database, originally released by Microsoft for SQL Server 2000, is a small database modeling a book publishing company. You can download it from this link.
So, based on the above diagram we have the following tables:
titles: contains all the published titles
authors: contains all the authors of the publishing house
titleauthor: because the relationship between titles and authors is an M-M, this table is used for resolving it
TopAuthors: this table references some authors who had a high sales activity and contains some relevant information like sales amount and bonus (yep, they are the lucky authors!
Let’s Build a C# Application and use ADO .NET Entity Framework
OK, now let’s proceed and see how we can build a simple C# application in Visual Studio 2008, which uses and introduces the ADO .NET Entity Framework and some of its basic features.
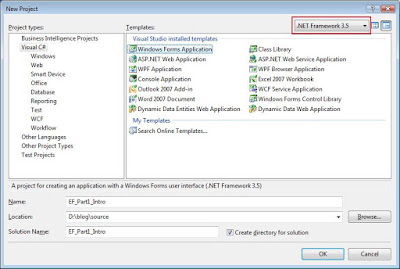
Step 1 – Create a new Visual Studio 2008 Project
The important thing here is to select .NET Framework 3.5.
As these examples are based on C#, I have chosen C# for my project type.
I am going to build a Windows Forms Application for this example.
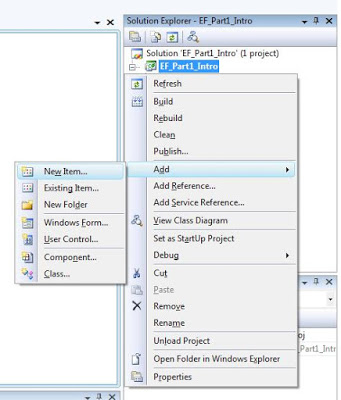
Step 2 – Add a new item to the project
By right-clicking on the project in the solution explorer, choose Add–>New Item:
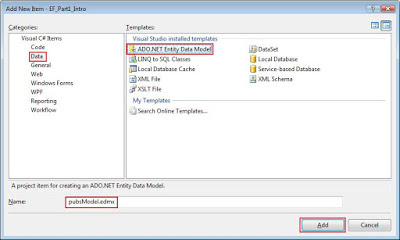
Next, as the following screenshot illustrates, select the Data category, then the ADO .NET Entity Data Model, give a name for your model (i.e. pubsModel.edmx) and click on Add:
The above step will initiate a Visual Studio 2008 wizard (the Entity Data Model Wizard) that will allow you to build very easily your Entity Data Model (EDM); a conceptual schema mapped to a relational model (in our case, the SQL Server database named “Pubs”).
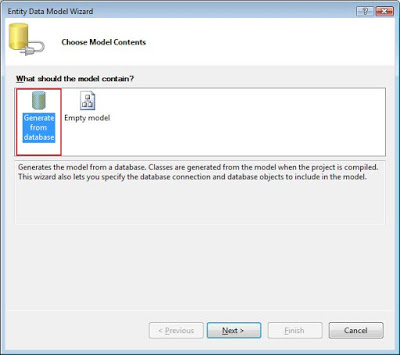
Step 3 – Entity Data Model Wizard – Create your Entity Data Model
Here you are presented with two options: (i) Generate a model from a database, (ii) Create an empty model and thus build everything manually. In our case we just select the first option as we want to generate a conceptual model (Entity Data Model; yep, I will be repeating myself a lot on that! that will be mapped to the “Pubs” database. Click Next.
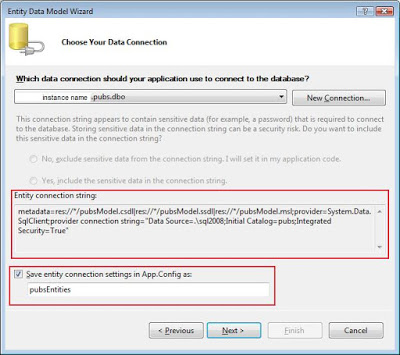
Now you must choose your data connection. You can either create a new connection or use an existing one. After establishing the connection, a very important thing to remember is the name you give for the entity connection string – you are going to reference this later on for getting access to the Entity Data Model, and through the mappings, to the SQL Server Database. The entity connection string is stored and can be found in the App.config file in your project.
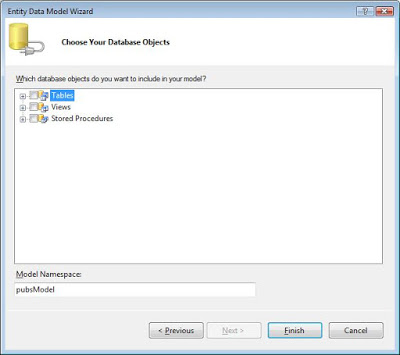
The following screen allows selecting which database objects will be included in the EDM. The selected tables and views will be automatically mapped to the generated EDM. You can also define the model namespace:
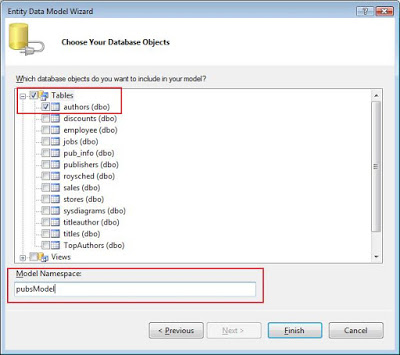
In our example application, we just select the authors table, keep the suggested Model Namespace and click on “Finish” (see screenshot below).
Note: During the automated generation of the EDM, the mappings are automatically constructed for the selected tables and Views.
Step 4 – The Entity Data Model Designer
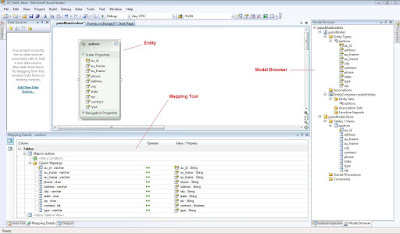
The following screen shows the graphical tool (EDM Designer) within Visual Studio 2008 that is used for visually modifying the generated Entity Data Model. As you can see on the screenshot, I noted three main “components/concepts”. These are: (i) Entity, (ii) Mapping Tool, and (iii) Model Browser.
At this point it is of great importance to explain the above three components. So we can see that on the workspace there is an Entity named authors. So what is an Entity in plain words? As you might have assumed is a representation of the “authors” table which exists in the “Pubs” database. Well that is correct but there is one word missing; conceptual. It is a conceptual representation of the “authors” table in the “Pubs” database. Also, in its simple form, an entity contains scalar properties.
In the Mapping Tool’s view, you can see that the “authors” entity is mapped to the “authors” database. So, on the left you see the table/columns of the relational model (Database) and on the right (after the operator) you can see the scalar properties of the entity that are mapped to the corresponding columns of the table on which the “authors” entity is also mapped.
I hope you didn’t get confused but if you did don’t worry, there is more explanation following.
Let’s have a closer look on the above concepts with the following screenshot:
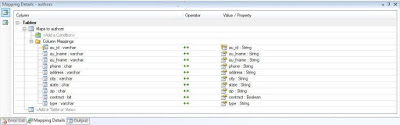
Let’s see the exact mappings for this example:
We have the “authors” entity mapped to the ”authors” table
We also have the displayed pairs of the table columns/data types mapped to pairs of the entity’s scalar properties/data types
So, when you query your Entity Data Model and ask for the value of the au_id scalar property within the Authors Entity, the Entity Framework will know through the mappings that it must query for the au_id column in the authors table in the Pubs database.
At this point, someone might still ask: what exactly is the “authors” entity and by what means is “conceptual”?
Let’s proceed to the next screenshot which will help better understand what exactly this EDM is and how exactly you can modify it with the graphical tool.
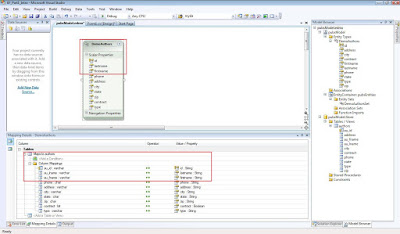
If you compare the above screenshot with the previous one, you will notice that some things changed. The entity formerly called Authors is now called DemoAuthors. Also the scalar properties au_id, au_lname and au_fname are now called id, lastname and firstname respectively.
Well, this is not a problem at all and that is one of the strong points about ADO .NET Entity Framework; you can modify the conceptual schema in the way you want, use among other naming conventions you might prefer, add new entities, use inheritance and entity splitting (these will be explained in subsequent demos) and much more without causing any problems to the Data Access.
The only thing that you must have in mind is that the mappings should always be maintained. In the above example, even though we have changed the name of the entity and some of its scalar properties, the mappings were automatically updated! Well, in some cases where you might perform some really complex modifications, you might have to fine-tune the mappings manually, though after all, I don’t think that this would be a problem.
So, based on the last few screenshots, we talked about the EDM graphical tool workspace (that is the place where entities are displayed) and about the mapping tool and mapping details.
The third component of the graphical tool is the Model Browser. In the Model Browser you can see all your objects used by EDM. To this end, you can see: Entities-Entity Types, Associations – Association Sets (representing the relationships between entities) and Function Imports (can be used for mapping database stored procedures and UDTs to the EDM). Also, you can see the corresponding database objects that are being used (mapped to the EDM) such as: Tables/Views, Constraints (for setting up relationships between database tables) and Stored Procedures respectively. By right-clicking on the model browser or on the EDM workspace, you can also update the model by adding and then mapping, even more database objects. Additionally, in the same way, you can refresh the model meaning that it will “read” again the database for possible changes.
Okay, at this point I believe that we can save our simple model, build our project and continue!
Step 5 – Use the EDM for Data Access
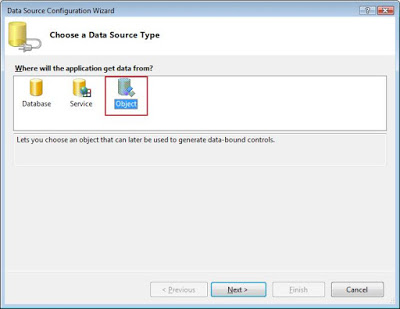
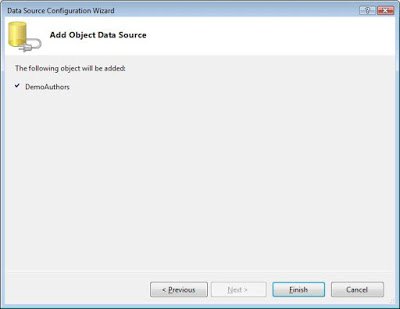
By now we have created the EDM, and we now need to use it as a data source.To this end, let’s add a new data source to the project and select the type Object as illustrated in the following screenshot:
Then, we just have to select the object we want to bind to the data source we are creating. At this point select the DemoAuthors entity and click on Next:
That’s it! Click on Finish and voila, you have the data source ready to serve data via the EDM!
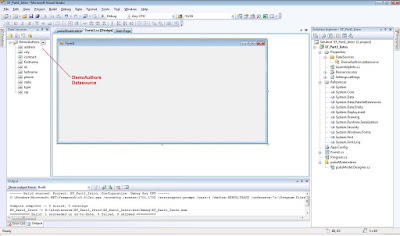
Let’s continue by dragging and dropping the DemoAuthors data source onto the form as in the following screenshot (if Data Sources explorer is not visible, you can change this setting from the View menu item):
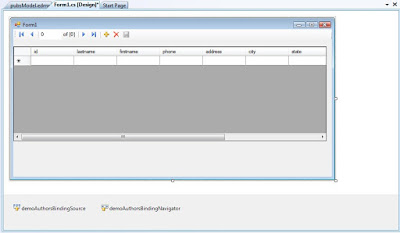
After dragging and dropping the DemoAuthors data source on the form we end up to the following screen:
By the way, let’s modify the properties of the Save icon and set Enabled to True (we need to add an event to this button/icon for allowing us to be able to post any changes performed on the data during the runtime/testing phase).
Then press F7. It is time to write some code!!!
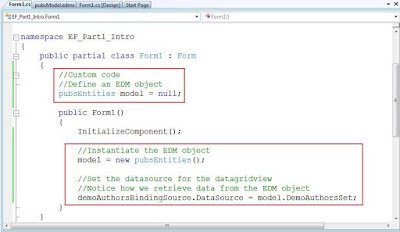
The two red rectangles contain the code that you should add:
In the first rectangle, we just declare an EDM object (based on the Entity connection string we saw earlier).
In the second rectangle, after the form’s initialization, we instantiate the EDM object called model (notice the pubsEntities object used here; that’s the connection string to our EDM). We also set the data source for the datagridview. How about the way we reference our data? Quite simple, right?
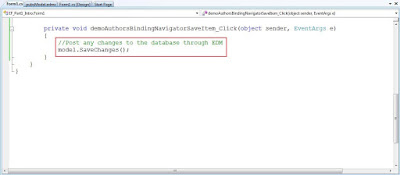
Let’s also add some more code by going back to the form, double-clicking on the Save icon, and adding code as in the following screenshot:
The only piece of code you need to add in order to be executed whenever the Save icon is clicked, is a single line: model.SaveChanges();
And now the last step; build the project and run it.
That’s it! Congratulations, you have just built your first ADO .NET Entity Framework C# Application!
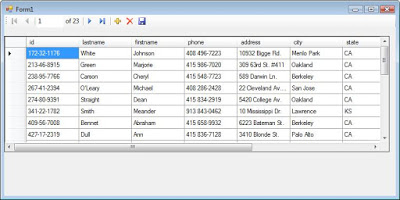
When the application starts, data is retrieved from the database via the EDM and displayed on the datagridview just like in the following screenshot:
Also, when you modify a record and click on the Save icon, the underlying event handler code (model.SaveChanges() method call) will post the changes to the Pubs database in SQL Server via the EDM. All the changes are saved with just the invocation of a single method!
Recap – Concepts Demonstrated
As a recap, let’s summarize the concepts presented in this tutorial. Among other, we performed and examined the following:
What actually is the ADO .NET Entity Framework (EF)
What is the Entity Data Model (EDM)
What an Entity is
How we can create an EDM from a relational database
What is the Mapping Tool and what the mappings actually do
What is the Model Browser
How we can access relational data through the EDM (with a simplified example) via the source code
How we can post changes to the relational database through the EDM
Learn More about ADO .NET Entity Framework and C# – Watch the Video!
As mentioned at the beginning of this post, it is the first in a series of posts dedicated to the ADO .NET Entity Framework and ways of data access through EDM such as Entity SQL (eSQL), Object Services and of course, LINQ to Entities!
In subsequent posts we will have a deeper dive into the Entity Framework and we will see significant features and concepts like: inheritance, entity splitting, complex mapping scenarios, Entity Provider, eSQL, Object Services, LINQ to Entities and much more!
Artemakis Artemiou is a seasoned Senior Database and AI/Automation Architect with over 20 years of expertise in the IT industry. As a Certified Database, Cloud, and AI professional, he has been recognized as a thought leader, earning the prestigious Microsoft Data Platform MVP title for nine consecutive years (2009-2018). Driven by a passion for simplifying complex topics, Artemakis shares his expertise through articles, online courses, and speaking engagements. He empowers professionals around the globe to excel in Databases, Cloud, AI, Automation, and Software Development. Committed to innovation and education, Artemakis strives to make technology accessible and impactful for everyone.
Views:3,178
We use cookies on our website to give you the most relevant experience by remembering your preferences and repeat visits. By clicking “Accept All”, you consent to the use of ALL the cookies. However, you may visit "Cookie Settings" to provide a controlled consent. Read More
This website uses cookies to improve your experience while you navigate through the website. Out of these, the cookies that are categorized as necessary are stored on your browser as they are essential for the working of basic functionalities of the ...
Necessary cookies are absolutely essential for the website to function properly. These cookies ensure basic functionalities and security features of the website, anonymously.
Cookie
Duration
Description
cookielawinfo-checkbox-analytics
11 months
This cookie is set by GDPR Cookie Consent plugin. The cookie is used to store the user consent for the cookies in the category "Analytics".
cookielawinfo-checkbox-functional
11 months
The cookie is set by GDPR cookie consent to record the user consent for the cookies in the category "Functional".
cookielawinfo-checkbox-necessary
11 months
This cookie is set by GDPR Cookie Consent plugin. The cookies is used to store the user consent for the cookies in the category "Necessary".
cookielawinfo-checkbox-others
11 months
This cookie is set by GDPR Cookie Consent plugin. The cookie is used to store the user consent for the cookies in the category "Other.
cookielawinfo-checkbox-performance
11 months
This cookie is set by GDPR Cookie Consent plugin. The cookie is used to store the user consent for the cookies in the category "Performance".
viewed_cookie_policy
11 months
The cookie is set by the GDPR Cookie Consent plugin and is used to store whether or not user has consented to the use of cookies. It does not store any personal data.
Functional cookies help to perform certain functionalities like sharing the content of the website on social media platforms, collect feedbacks, and other third-party features.
Performance cookies are used to understand and analyze the key performance indexes of the website which helps in delivering a better user experience for the visitors.
Analytical cookies are used to understand how visitors interact with the website. These cookies help provide information on metrics the number of visitors, bounce rate, traffic source, etc.
Advertisement cookies are used to provide visitors with relevant ads and marketing campaigns. These cookies track visitors across websites and collect information to provide customized ads.